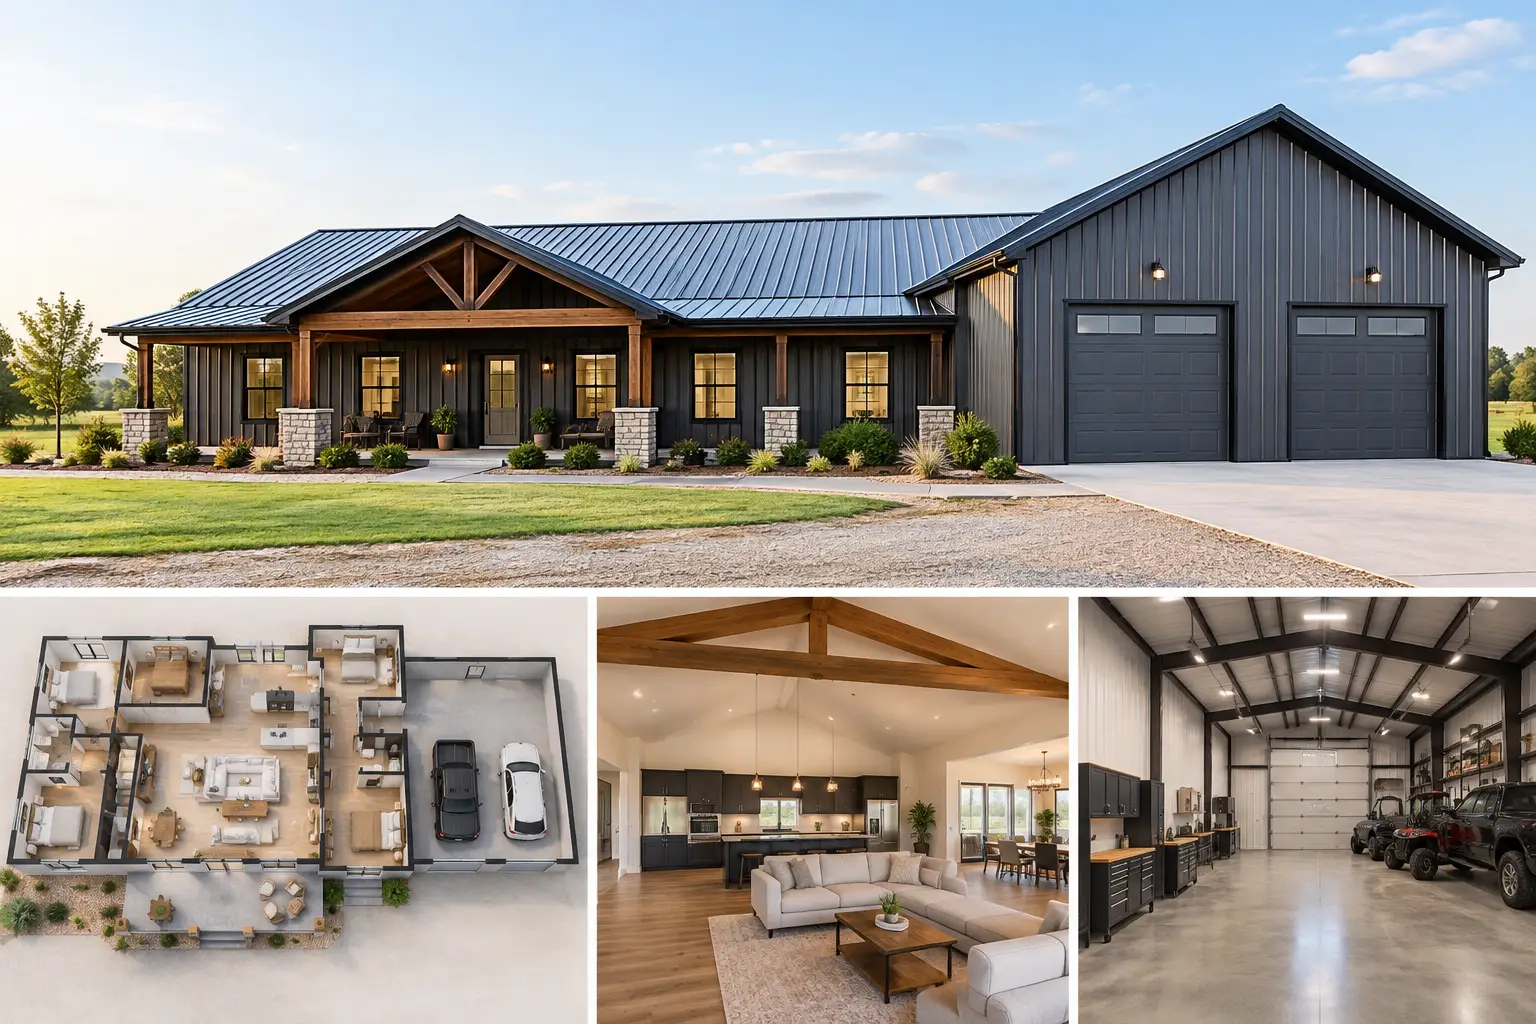
A 40×60 barndominium with garage gives you 2,400 square feet to divide between daily living, vehicle storage, a shop, and the practical spaces that make a rural or acreage property work. It is large enough to feel like a true home, but still compact enough that the layout, foundation, and finish choices have a major effect on the total project budget.
The key is deciding what the garage needs to do before choosing the floor plan. A two-car garage used only for parking needs far less space than a garage that will also hold ATVs, farm tools, a workbench, seasonal storage, or an RV. No guesswork. Start with your real needs, then build the square footage around them.
What Fits in a 40×60 Barndominium With Garage?
The 40-foot-by-60-foot footprint is flexible because the long 60-foot side can be divided into clear zones. Many owners place the garage or shop at one end and keep the living area at the other. This creates a simple separation between vehicle activity and the quieter parts of the home.
For example, a 24×40 garage area uses 960 square feet, leaving 1,440 square feet for living space. That remaining area can support a comfortable two-bedroom layout with an open kitchen and living room, bathrooms, laundry, closets, and mechanical space. A smaller 20×30 garage uses 600 square feet, which leaves 1,800 square feet for the home and allows more room for bedrooms or a larger primary suite.
There is no single right split. A homeowner with two pickups and a side-by-side may value a 30×40 garage. A couple building on retirement land may prefer more living space and a modest 20×30 attached garage. If the building will support a business, ranch operation, or serious workshop, the garage side may need more depth, taller walls, and larger overhead doors.
Layout choices that work well
A front-to-back split places the garage across one end of the building, often with overhead doors on a gable or sidewall. It is straightforward to plan and makes utilities easier to organize. The living area can have a separate front entry, covered porch, and rear patio.
A side-by-side arrangement runs the garage and home along the 60-foot length. This can create a wider, more traditional-looking living area, but it may require careful planning around roof lines, windows, door placement, and the distance between garage doors and the driveway.
Some owners also include a shared mudroom between the garage and home. It is one of the most useful square footage decisions in a barndominium. A mudroom gives you a place for work boots, coats, pet supplies, a utility sink, and laundry without bringing dirt directly into the main living room.
Plan the Garage Before You Order the Building
Garage dimensions affect more than parking. They determine door sizes, slab design, wall openings, electrical needs, and the building’s engineered framing. Sketching a few rectangles on paper is a good starting point, but measure the actual vehicles and equipment you intend to store.
A typical two-car garage might use two 9-foot-wide doors or one wider door. Larger pickups, enclosed trailers, tractors, and RVs can require more width and height. Door height matters as much as door width. A door that works for a standard SUV may be frustratingly short for a lifted truck or equipment trailer.
Think about clearance inside as well. You need room to open vehicle doors, walk around stored equipment, and use any planned workbench. If you want a lift, tall storage racks, or a future vehicle hoist, discuss those plans early. They may affect wall height, slab thickness, reinforcement, electrical service, and local permit requirements.
Keep the garage-to-home connection practical. An insulated, fire-rated separation may be required by local code, and it is a sensible feature even where requirements vary. A properly planned transition also helps control fumes, dust, and noise from the garage or shop area.
Red-Iron Framing and the Value of Early Engineering
A pre-engineered red-iron steel building is designed around the location, dimensions, roof loads, wind exposure, openings, and intended use. That engineering is not a formality. It determines the structural system that supports your roof, walls, doors, and local code requirements.
A 40×60 footprint is often a practical size for structural steel because it can provide open interior space without requiring a traditional interior support layout. Exact clear-span capability and framing placement depend on the engineered design, building height, loading conditions, and door openings. Large overhead doors in particular need to be accounted for before the building package is designed.
This is why it pays to finalize the basics before requesting pricing: building width and length, wall height, roof style, garage door sizes, window locations, insulation approach, and location. Changing a few windows is usually easier than moving an oversized overhead door after engineering has begun.
Foundation and Site Work Can Change the Budget Fast
The building is only one part of the project. A 40×60 barndominium with garage needs a foundation designed for the structure and local conditions. In many cases, that means a concrete slab with properly engineered perimeter details, reinforcement, anchor bolts, and any required thickened areas for loads or door openings.
Your site matters just as much. A level, accessible building pad with good drainage is usually simpler to prepare than a sloped or heavily wooded parcel. Excavation, grading, fill material, drainage improvements, utility trenching, driveway work, and septic or well installation can all add meaningful cost before the steel arrives.
Do not assume a flat-looking piece of land needs little preparation. Water movement is one of the first issues to address. Finished floor elevation, drainage away from the slab, and driveway slope should be considered together. Correcting drainage after construction is far more difficult than planning it at the start.
Budget by Scope, Not Just Building Price
Buyers sometimes see a price for a steel building package and assume it represents the total cost of a finished barndominium. It does not. The package may cover the engineered steel framing, roof and wall panels, trim, and selected accessories, while the overall project also includes foundation work, erection, exterior doors, overhead doors, insulation, interior framing and finishes, plumbing, electrical, HVAC, permits, and site work.
The final cost can vary widely by region, labor availability, wind and snow requirements, soil conditions, finish level, and the amount of garage space versus conditioned living space. A basic garage area generally costs less to finish than a kitchen, bathroom, or bedroom suite, but large doors, tall walls, heavy electrical service, and shop upgrades can narrow that gap.
A better way to compare quotes is to ask what is included at each stage. Confirm whether pricing includes engineering, delivery, erection, concrete, insulation, doors, interior buildout, and permit-related items. A low initial number can be misleading if major scopes are missing.
Where to save without hurting the project
Simple building shapes usually cost less to plan and construct than designs with many offsets and roof transitions. Keeping plumbing areas close together can reduce runs for water and drain lines. Choosing garage doors, windows, and exterior doors early helps avoid expensive redesigns later.
Savings should not come from skipping engineering, undersizing the foundation, or overlooking insulation. Those decisions can create comfort, moisture, and performance problems that cost more to fix after the building is complete.
Insulation, HVAC, and Moisture Control
A steel shell needs a complete insulation and moisture-control strategy, especially when it contains conditioned living space. The right approach depends on climate, wall and roof assembly, local energy code, and whether the garage will be heated or cooled.
For the living area, homeowners commonly consider insulation systems that reduce heat transfer and help control condensation at the metal panels. The garage may be insulated differently depending on whether it is used as a conditioned workshop, simple vehicle storage, or equipment space. The goal is to create a comfortable, durable building envelope rather than simply adding insulation wherever it fits.
HVAC should be planned with the finished layout in mind. Room locations, ceiling height, window placement, garage separation, and local climate all affect equipment sizing and duct routing. Coordinate this before interior walls are closed so there is room for electrical, plumbing, ventilation, and mechanical systems.
Permits and the Right Project Team
Permit requirements vary by county, city, and state. Your local jurisdiction may review structural plans, foundation details, energy requirements, septic plans, electrical work, plumbing, and driveway access. Some areas also have zoning limits for setbacks, building height, lot coverage, or accessory uses.
Start that conversation early with the local building department. Ask what documents are required, whether the parcel has restrictions, and when inspections occur. Then work with qualified local professionals who understand residential construction and pre-engineered steel building systems. A clear scope of work helps every trade price the job more accurately.
When you are ready to compare options, visit TurnkeyFloorPlans.com, click “Get a Free Building Quote,” and submit your dimensions, location, intended use, and project details. The quote request is free and no-obligation. The more clearly you define your garage needs, site conditions, and finish goals, the easier it is to move from a good idea to a buildable plan.
Leave a Reply